 
|
Page 1 of 1
|
[ 13 posts ] |
|
| Author |
Message |
|
|
Post subject: Colourization Tutorial For PSP7 -Finally Here  Posted: Posted: August 20th, 2006, 6:12 pm |
|
Joined: 10 July 2005
Posts: 23149
Location: Where there are handsome heroes and sexy villains.. all that need some lovin' ;)
Country: ")
Gender: Female

|
On my colourization thread in the Fan Art section I keep getting asked how I make them and do they take long. Well I have decided to create a tutorial for you all, showing you exactly how I do it. I don't know if there is an "official" way as I figured this method out for myself. I also don't know if this can be used other versions of PSP or Photoshop. Hopefully it will be of some use to you all.  First off...
What is a colourization?
A colourization is basically an image you colour in yourself. It can be a black and white image or you can find an image already coloured, and grey scale it in your programme, so it's ready to be coloured. The idea is to try and make the colourization as realistically as possible, so having the original colour photo is ideal. Depending on the image and how intricate it is, it can take anything up to 2 days or sometimes 2 hours. So patience is needed, as if you rush them the overall effect will be ruined.
First off...
What is a colourization?
A colourization is basically an image you colour in yourself. It can be a black and white image or you can find an image already coloured, and grey scale it in your programme, so it's ready to be coloured. The idea is to try and make the colourization as realistically as possible, so having the original colour photo is ideal. Depending on the image and how intricate it is, it can take anything up to 2 days or sometimes 2 hours. So patience is needed, as if you rush them the overall effect will be ruined.
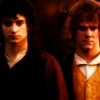
In this tutorial you will turn this:
http://img20.imageshack.us/img20/4403/ssseh6.jpg
Into this:
http://img244.imageshack.us/img244/5263/ss15rc0.jpg
Into this:
Step One
Find yourself a picture you would like to colourize. Open it in PSP. If it was originally a colour picture, try and find the original so you can match the colours. If you can't do this, find another picture which is similar (in colour) so you can match skin tones etc. Open this image in PSP. On the black and white image go Layers>>>Duplicate.
Your screen should now look like this.
http://img148.imageshack.us/img148/3590/ss1rj3.jpg
Step Two
Decide which area you are going to colour in first. (I usually start with the hair first for women but the skin first for men). Now, take your "Dropper" tool (9th from the left in the tool bar) and click on the skin in the colour photo. You will see the colour you selected appear on the right hand side. You then click on the "Retouch" tool (13th from the left). Bring up the Tool Options box (press O) and then click on the middle of the buttons in the top left of the box (Retouch Options). On the drop down box click "Colour to Target". That is the setting needed for colourizing. The colour you selected will now be used using Retouch. (The opacity for Retouch varies depending on what you are doing, but I tend to use 100% most of the time.)
Step Three
This next stage is really a case of trying your luck with the skin tones. You really need to experiment with the colours, and don't worry if it looks bad, as you can easily re-do it or cover it up with another colour. Colour all the skin, and don't be bothered if the colour goes onto other areas. We'll sort that out later. If using less then 100% opacity (see below) do not go over the same areas to much or you will end up with 100% opacity. If it looks patchy it will be covered up with other layers.
Here is what it looked like, using one colour - #FFCDAB - Opacity 50
http://img20.imageshack.us/img20/599/ss22jpggr0.jpg
Eep! Yes, it looks a mess but don't worry!
Here is what it looked like, with another colour added - #E0A386 - Opacity 50
http://img228.imageshack.us/img228/6218/ss33ey2.jpg
Yes, it still looks bad but let's try one more colour.
Last colour has been added - #FFD1B0 - Opacity 50
http://img228.imageshack.us/img228/5895/ss4bk4.jpg
And when you think you have some sort of skin colour....
Step Four
This is the clever part. Duplicate you current layer - Layers>>>>Duplicate so now you have 2 copies of your original grey scale image.
http://img71.imageshack.us/img71/4434/ss5sc5.jpg
Now, for this duplicate go to Effects>>>Blur>>>>Guassian Blur with the Radius set to 5.00. Click Ok. Now go to Layers>>>>Properties and in the drop down box, set the Blend Mode to Soft and click Ok.
Your image should now look like this.
http://img297.imageshack.us/img297/526/ss6jy0.jpg
As you can see the skin tone looks much better. You now delete this layer. This was just to see what the colour looks like under soft light. If you are not happy with how it looks you can change the opacity, or re-do the colouring of the skin. Colourizations look better with a "glow" so I always use it. Sometimes when you use glows, the excess colour that goes onto the hair for example, can actually match perfectly (even though it looked a mess before). In this case the hair is much too red so in the next step you will go back to this image.
http://img228.imageshack.us/img228/5895/ss4bk4.jpg
Step Five
Now you are going to erase all the skin colour that has spread to other areas. This is the reason why you duplicated the original image in the first place, because now you can get rid of all the colour you don't want. If you had started with one layer you would have had to colour in the skin, very very carefully, making sure you didn't go into any other areas. This way it is much easier and quicker. Leave the hair on the forehead and the eyes for now.
You should then have something like this.
http://img64.imageshack.us/img64/7190/ss7rr7.jpg
Now lower the opacity of the Retouch and very carefully go over the hair that is over the forehead. It doesn't need to be completely free of skin colour but just enough. Make sure you don't take too much of the skin colour with it. When this is done, move onto the eyes. The eyes are important so take your time with them. Then check the image for any spots you have missed and when your sure everythinng looks Ok, go Layers>>>Merge>>>Merge All.
You should have something like this.
http://img234.imageshack.us/img234/1849/ss8ku3.jpg
Step Six
Now for the hair you follow Steps Three, Four and Five. Again experiment with the colour for the hair etc etc. Then erase the excess.
This is what it should look like after you have added colour (I used #2B1812 with 100 opacity and added #7F4E2E with 100 opacity for highlights) and before you erase it.
http://img80.imageshack.us/img80/1208/ss9eo5.jpg
This is what it looks when you have erased it and added the Soft glow.
http://img136.imageshack.us/img136/3961/ss10nl6.jpg
Step Seven
Your almost there! Now all the you have to do is Duplicate the image and add colour to the eyes and the lips. Colour the eyes in and the lips in the colour you wish to use (eyes #0E782C Opacity 60 and lips #C57775 Opacity 30), erase any excess and the go Layers>>>Merge All.
And that's it! Your done! You should now have something that looks like this.
http://img143.imageshack.us/img143/125/ss15kj1.jpg
You can add text and brushes if you want, as sometimes colourizations need something a little extra. I wouldn't recommend using textures though as they ruin the overall look.
So I hope this will be of some use to you folks. I've tried too explain it as best I could, and if it sounds hard and complicated - it's not really, it's just me explaning it badly. 
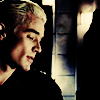
_________________ 

^ By me and my SS *squiggle hugs*
|
|
| Top |
|
 |
|
|
Post subject: Posted: August 20th, 2006, 8:13 pm |
|
Joined: 03 June 2005
Posts: 5602
Location: Canada
Country: ")
|
I was wondering when you would make a tutorial, your colourisations are amazing! Unfortunately, I don't use PSP. I shall have to find another tutorial. But great job with this one, I'm sure it will be useful to many people.
_________________
Proud Member of the The Evilishy Nazgûl Alliance for World Domination
{Beri}
|
|
| Top |
|
|
|
|
Post subject: Re: Colourization Tutorial For PSP7 -Finally Here Posted: August 20th, 2006, 9:15 pm |
|
Joined: 02 September 2005
Posts: 2093
|
Very nice tutorial Johnny's Fan 
Your advice helped me out a lot!!
One question kinda off topic how do you copy the whole screen like in the example?
Thanks Rin
Johnny's Fan wrote: _________________ 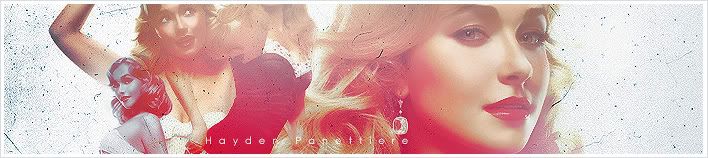 <br><br><a href="http://immortalkiss.sarrand.net/"><img src="http://immortalkiss.sarrand.net/ik_lb6.jpg" border="0"></a>
|
|
| Top |
|
|
|
|
Post subject: Posted: August 20th, 2006, 9:35 pm |
|
Joined: 03 May 2005
Posts: 4717
Location: Middle-earth
Country: ")
Gender: Female
|
I know, I know! The print screen key! To the right of F12; mine says prt scr/sysrq. Then just paste into your graphics program, and you have a literal "screen" capture.
Great tutorial, btw, JF! I follow very similar methods to colorize pictures _________________ 
|
|
| Top |
|
|
|
|
Post subject: Posted: August 20th, 2006, 9:47 pm |
|
Joined: 10 July 2005
Posts: 23149
Location: Where there are handsome heroes and sexy villains.. all that need some lovin' ;)
Country:
Gender: Female
|
|
| Top |
|
|
|
|
Post subject: Posted: August 20th, 2006, 11:36 pm |
|
Joined: 03 May 2005
Posts: 4717
Location: Middle-earth
Country:
Gender: Female
|
Pfft, as long as a method works in the end, there's no "correct" one! I'm sure there are lots of different ways to get similar effects sometimes, but as long as they all work, it's silly to say one is "better" than the other (unless one is a ton more time-consuming...or something...). Ok so I'm not making sense, but whatever  _________________
|
|
| Top |
|
|
|
|
Post subject: Posted: August 21st, 2006, 10:17 am |
|
|
Jo |
| Moderator |
 |
 |
Joined: 03 June 2005
Posts: 1302
|
|
exactly there are no 'officialy correct' ways to colour a picture.
And it is really easy to transfer it over to photoshop for instance.
_________________
We're one world, one people weather we like it or not.. we can pretend we're divided into races and countries.. But the reality is that it is one world and it is one people.
|
|
| Top |
|
|
|
|
Post subject: Posted: August 21st, 2006, 4:19 pm |
|
Joined: 10 July 2005
Posts: 23149
Location: Where there are handsome heroes and sexy villains.. all that need some lovin' ;)
Country:
Gender: Female
|
Arwen the webmaster wrote: Pfft, as long as a method works in the end, there's no "correct" one! I'm sure there are lots of different ways to get similar effects sometimes, but as long as they all work, it's silly to say one is "better" than the other (unless one is a ton more time-consuming...or something...). Ok so I'm not making sense, but whatever  Just I have never known how other people do it, so whether I use the "complicated" way or not I didn't really know until now. Just I have never known how other people do it, so whether I use the "complicated" way or not I didn't really know until now._________________
^ By me and my SS *squiggle hugs*
|
|
| Top |
|
|
|
|
Post subject: Posted: August 22nd, 2006, 7:46 am |
|
Joined: 02 July 2006
Posts: 3070
Location: Hitch-hiking to Vegas
|
I found a way yesterday of doing it using this hue map thingy...you do end up doing it mostly the same way as your method tho Nice tutorial and lovely colourizations.
Sam _________________ <center>
Can't take the Kid from the Fight take the Fight from the Kid
engaged to Tyson Ritter-my love forever
<a href="http://www.dance-to-this-beat.net"> Dance to this Beat</a>
</center>
|
|
| Top |
|
|
|
|
Post subject: Posted: August 25th, 2006, 8:09 pm |
|
Joined: 10 July 2005
Posts: 23149
Location: Where there are handsome heroes and sexy villains.. all that need some lovin' ;)
Country:
Gender: Female
|
Merry & Sam wrote: I found a way yesterday of doing it using this hue map thingy...you do end up doing it mostly the same way as your method tho Nice tutorial and lovely colourizations. Sam _________________
^ By me and my SS *squiggle hugs*
|
|
| Top |
|
|
|
|
Post subject: Posted: August 29th, 2006, 2:45 pm |
|
Joined: 04 June 2005
Posts: 4428
Location: USA
|
|
Thanks, JF! that was very helpful.
_________________ <center> ><>Ringer for Christ<><

^Thanks to Altariel Frodo!
<center>
|
|
| Top |
|
|
|
|
Post subject: Posted: August 29th, 2006, 10:26 pm |
|
Joined: 10 July 2005
Posts: 23149
Location: Where there are handsome heroes and sexy villains.. all that need some lovin' ;)
Country:
Gender: Female
|
|
| Top |
|
|
|
|
Post subject: Re: Colourization Tutorial For PSP7 -Finally Here Posted: September 8th, 2025, 10:31 pm |
|
Joined: 20 January 2025
Posts: 165021

|
|
| Top |
|
|
|
|
Page 1 of 1
|
[ 13 posts ] |
|
Who is online |
Users browsing this forum: No registered users and 4 guests |
|
You cannot post new topics in this forum
You cannot reply to topics in this forum
You cannot edit your posts in this forum
You cannot delete your posts in this forum
You cannot post attachments in this forum
|
Powered by phpBB © 2000, 2002, 2005, 2007 phpBB Group
Boyz theme by Zarron Media 2003
|
|


