| Author |
Message |
|
|
Post subject:  Posted: Posted: January 14th, 2006, 9:31 am |
|
Joined: 07 June 2005
Posts: 2370
Location: England, normally in my room

|
Oh, right.... I dunno why that is  _________________ <center>
|
|
| Top |
|
 |
|
|
Post subject: Posted: January 16th, 2006, 2:18 pm |
|
Joined: 06 May 2005
Posts: 15181
Location: Minas Morgul
|
|
I know I'm shameless, but do you think you could do a brushes tutorial?
Your tutorials are the only ones that have helped me because it's very simple and basic.
Now, I downloaded the brush and I've done the 'Load Brush' all ready but I'm absolutely lost from there on out.
_________________
<center>
THE HALLOWFEST 2010
<a href="http://www.arwen-undomiel.com/forum/viewtopic.php?t=20958">information here</a>
</center>
|
|
| Top |
|
|
|
|
Post subject: Posted: January 16th, 2006, 6:06 pm |
|
Joined: 07 June 2005
Posts: 2370
Location: England, normally in my room
|
Shameless, our Kitoky is.
Tutorial, Ororuthiel will do.  _________________ <center>
|
|
| Top |
|
|
|
|
Post subject: Posted: January 16th, 2006, 6:09 pm |
|
Joined: 06 May 2005
Posts: 15181
Location: Minas Morgul
|
Thanks a bunch, Oro. Much appreciated. 
_________________
<center>
THE HALLOWFEST 2010
<a href="http://www.arwen-undomiel.com/forum/viewtopic.php?t=20958">information here</a>
</center>
|
|
| Top |
|
|
|
|
Post subject: Posted: January 16th, 2006, 6:30 pm |
|
Joined: 04 June 2005
Posts: 4449
Location: Northern USA
|
I love your Grahpics Resource site!! How come I haven't seen it before??  *goes to favorite* (you should see my list of favorites -- it's never ending!) Great new tuts! If I had time I'd just make tons of graphics using all these different tuts!! _________________ 
<center> icon & banner by me
skyward-thoughts</center>
|
|
| Top |
|
|
|
|
Post subject: Posted: January 30th, 2006, 7:41 pm |
|
Joined: 04 June 2005
Posts: 362
Location: Shire
|
hey oro... i luv yer graphics ;D
Once ye made an arwen banner with pics of the "the crownless again shall be king" quote/scene in lotr.
it has kinda an "old" touch. some other banners of you have this effect too.
Can ye write a tutorial? that would be soooo cool!!!

|
|
| Top |
|
|
|
|
Post subject: Posted: February 6th, 2006, 2:38 pm |
|
Joined: 07 June 2005
Posts: 2370
Location: England, normally in my room
|
Sure, I'll do that after I'm not ill  And I'll do Kit's too, while I'm at it _________________ <center>
|
|
| Top |
|
|
|
|
Post subject: Posted: February 7th, 2006, 12:48 pm |
|
Joined: 04 June 2005
Posts: 3742
Location: Somewhere, far far away...
|
|
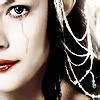
Oro how do you get the tear effect? It looks really pretty...
_________________ <center>&& au'er since 06/07/04 &&

x.98% of teens will try, does or has tried smoking pot. If you're one of the 2% who hasn't, copy & paste this into your signature..x</center>
|
|
| Top |
|
|
|
|
Post subject: Posted: February 17th, 2006, 10:48 am |
|
Joined: 07 June 2005
Posts: 2370
Location: England, normally in my room
|
|
Tear effect? You mean with it looking like ripped paper or something?
_________________ <center>
|
|
| Top |
|
|
|
|
Post subject: Posted: February 17th, 2006, 11:25 am |
|
Joined: 07 June 2005
Posts: 2370
Location: England, normally in my room
|
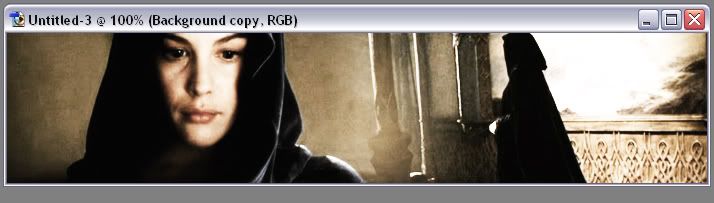
<B>Brush Tutorial</B> <I>Originally written for Kitoky</I>
<font size=1>Brushes by Loleia
Image courtesy of A-U
</font>
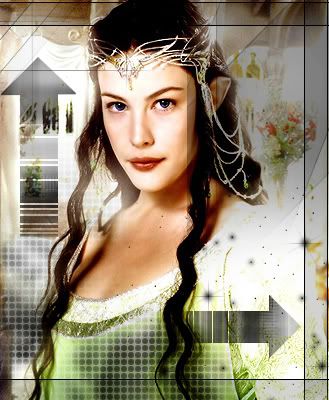
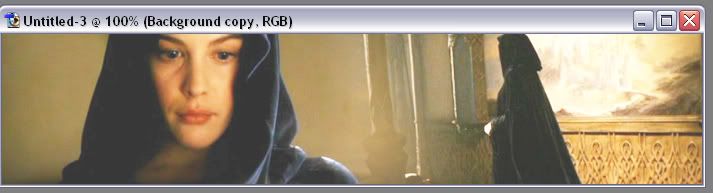
I'm going to go from this:

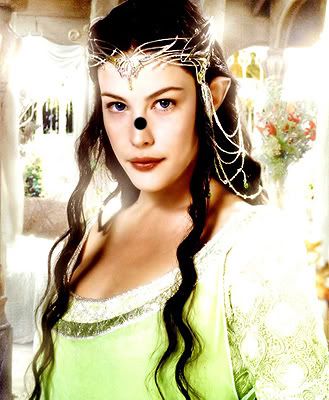
To this:
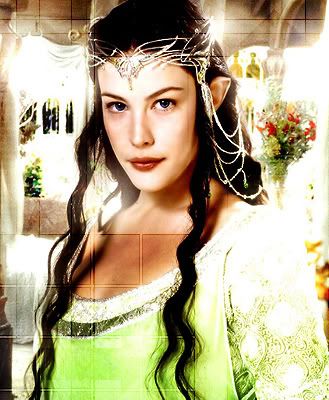
1. Open up your image; in this case, my favourite picture of Arwen. This can be a banner, blend, wallpaper or any other type of graphic, but for simplicity I'm just using a picture.
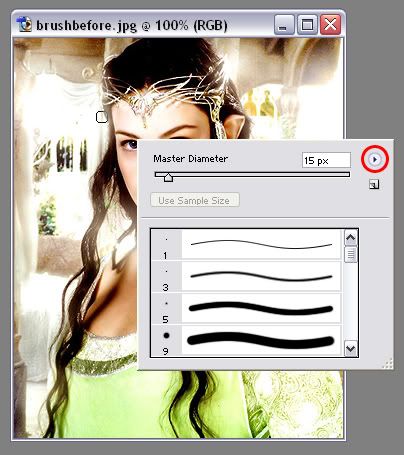
2. To the left of the PS screen there should be a toolbar, go to Windows>>Tools if you can't see it. You need to click on the icon that looks like this: 
3. Right click on your image; it should come up with a menu like this:

4. Here you will see a list of brushes that you can use. To use them, select one of the brushes and click on your image where you'd like your brush to go, like this:
5. Obviously that looks stupid, but never mind that If you don't want to use any of the brushes in that list, right-click again and click on this little arrow:
6. You should get a menu like this:
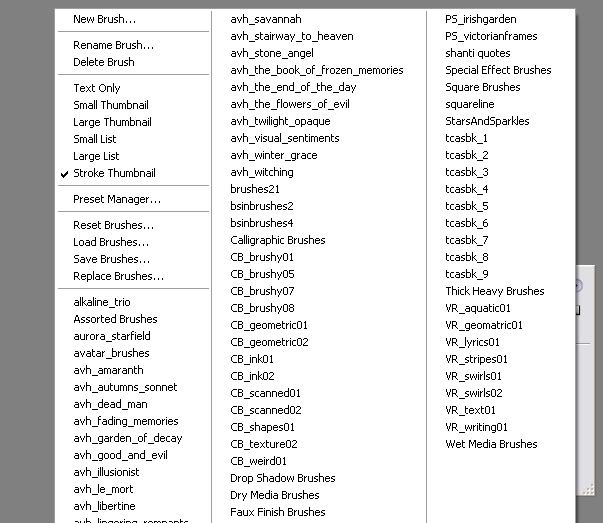
If you want to upload a brush set you've downloaded, click on "Load brushes" at the top left and upload it. The brushes will then appear at the bottom of the list of the brushes you saw in step 3. The next time you load PS, it'll be in a seperate set.
7. If you want to use a brush set you've already downloaded, however, click on the set and click "OK" when prompted. The set I'm going to use is called "CB_geomatric01" by Loleia [link at the beginning of tutorial]
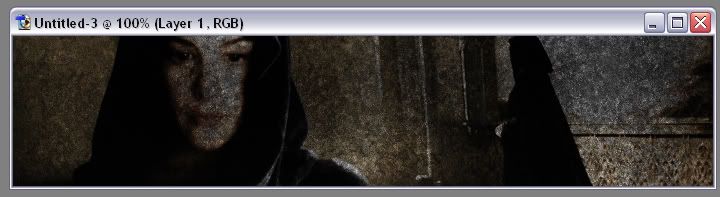
8. Now you can use the different brushes to put them on your image like in step 4, like this:
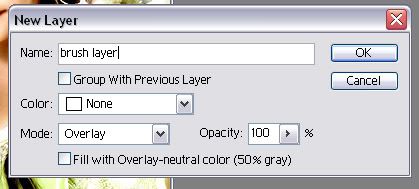
9. Now, that doesn't look very pretty, but we can change this. I <I>always</I> put my brushes onto a new layer, so that if I make any mistake I can just delete the layer and start again. So go to Layer>>New>>Layer and set the settings like this: [you don't need to name it brush layer, by the way]
10. Now pick up your brush tool again, and at the top there should be a menu like this:

Set the "Mode" to Overlay.
11. Now find your brushes and put them onto your image. It should now look something like this:
Now that looks a lot nicer, doesn't it? This is generally the setting I use when I put brushes on a graphic, but you can change the mode to anything else, such as Screen, Multiply, etc.
Hope that helped, again any questions, feel free to ask!
PS: I am aware, Kitoky, that you knew how to load the brushes, but I figured that some people might not, so I wrote that bit in too _________________ <center>
|
|
| Top |
|
|
|
|
Post subject: Posted: February 17th, 2006, 11:56 am |
|
Joined: 04 June 2005
Posts: 3742
Location: Somewhere, far far away...
|
Ororuthiel wrote: Tear effect? You mean with it looking like ripped paper or something?
No, the one that you had for those avaters in your sig before, do you know what i mean? _________________ <center>&& au'er since 06/07/04 &&
x.98% of teens will try, does or has tried smoking pot. If you're one of the 2% who hasn't, copy & paste this into your signature..x</center>
|
|
| Top |
|
|
|
|
Post subject: Posted: February 17th, 2006, 12:17 pm |
|
Joined: 07 June 2005
Posts: 2370
Location: England, normally in my room
|
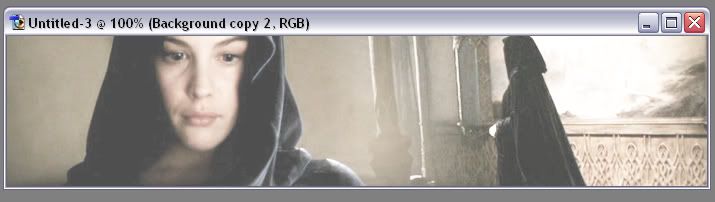
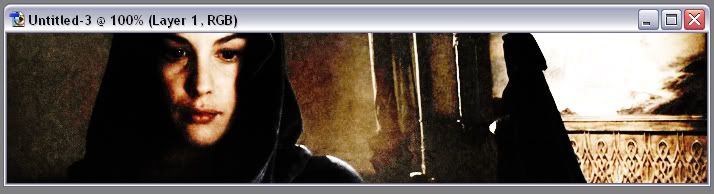
Banner Tutorial 003. Originally written for Myra
<font size=1>Images courtesy of A-U</font>
I'll be going from this:

To this:

1. Open up your banner/image/whatever, and duplicate the layer.
2. Set the resulting layer mode to "Screen" and desaturate it.
|
v
3. Duplicate the screen layer and set it to "Soft Light".
|
v
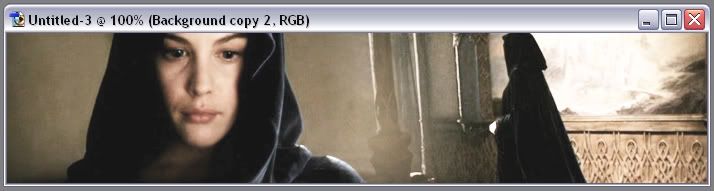
4. Take your orignal picture, and duplicate the layer again. Move that layer so it's on top of all of your other layers, and set it to "Soft Light".

5. Desaturate that layer.
6. Make a new layer, and pick up your brush tool. I'm going to use this one that is part of a brush set called CB_texture02 by Loleia. Cover your image in this brush, like this:
7. Set this brush layer to "Overlay", and bring the opacity of layer down to about 65%, or whatever looks best to you. It should now look like this:
|
v
8. Go to Layer>>Flatten image. Then go to Image>>Adjustments>>Hue/Saturation and bring the "Saturation" to -60, or again whatever looks best to you.

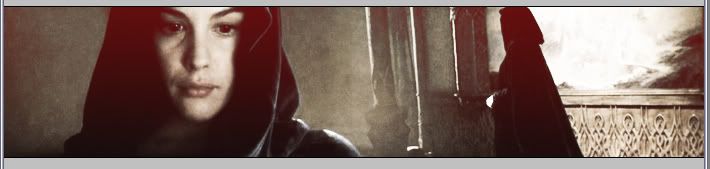
9. Go to Layer>>New and make that layer mode "Lighten". Go to the colour changing box and choose a reddish colour. I chose #A20000.
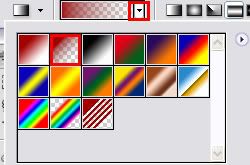
10. Now go to the Gradient Tool (G), and at the top of the screen there will be something like this:

11. Select the arrow indicated in the image below and make sure it's set like this:
12. Now make a vertical line across your image, and you should have something like this:
13. You can now lower the opacity of this layer to however it suits you, and you're done! Any questions, as usual, don't be afraid to ask
_________________ <center>
|
|
| Top |
|
|
|
|
Post subject: Posted: February 17th, 2006, 12:18 pm |
|
Joined: 07 June 2005
Posts: 2370
Location: England, normally in my room
|
Pearl Evenstar wrote: Ororuthiel wrote: Tear effect? You mean with it looking like ripped paper or something? No, the one that you had for those avaters in your sig before, do you know what i mean? Oh, you mean like this?
[sorry for double posting, moderators!  ] _________________ <center>
|
|
| Top |
|
|
|
|
Post subject: Posted: February 17th, 2006, 12:19 pm |
|
Joined: 04 June 2005
Posts: 3742
Location: Somewhere, far far away...
|
Yeah... it looks really nice _________________ <center>&& au'er since 06/07/04 &&
x.98% of teens will try, does or has tried smoking pot. If you're one of the 2% who hasn't, copy & paste this into your signature..x</center>
|
|
| Top |
|
|
|
|
Post subject: Posted: February 17th, 2006, 12:26 pm |
|
Joined: 07 June 2005
Posts: 2370
Location: England, normally in my room
|
Arrrr, yesh, we can run off a very quick tutorial on that _________________ <center>
|
|
| Top |
|
|
|
|
Post subject: Posted: February 17th, 2006, 12:30 pm |
|
Joined: 27 September 2005
Posts: 2895
Location: Germany
|
Yay! Your tuts are wonderful, Oro, thanks so much for taking your time to do them 
|
|
| Top |
|
|
Who is online |
Users browsing this forum: No registered users and 11 guests |
|
You cannot post new topics in this forum
You cannot reply to topics in this forum
You cannot edit your posts in this forum
You cannot delete your posts in this forum
You cannot post attachments in this forum
|
Powered by phpBB © 2000, 2002, 2005, 2007 phpBB Group
Boyz theme by Zarron Media 2003
|
|


